Thursday, April 25, 2024

Art and Not Art

 
Late in posting about my week of Flower Flow because of an annoying computer glitch taking hours of research and trial & errors to fix the problem. I am nothing if not stubborn and determined when this happens, and I am happy to say I appear to have found the fix and the old computer is speeding along doing everything it should. So that's the Not Art part, along with my return to knitting. After the bumps making that pair of socks, I found myself hesitant to dive into a sweater project, so I eased into it by swatching the three stitch patterns for the sweater. In all my previous years of knitting, I don't think I've ever knitted up a test piece to check gauge, just trusting that if I used the type of yarn and size of needles required, everything would turn out the right size. That may be why one of the sweaters I knitted for my tall husband with the long arms was so oversized that it could have fitted a linebacker over all his gear! I was pleased that this swatch showed I was right on gauge and the stitch patterns easy and providing a little interest. I've started the actual sweater now with the recently purchased mill end wool and am enjoying having my hands busy in the evenings while watching TV.


Now for the free workshop,, Flower Flow. This is the first section of the full class Laly Mille teaches, what they are now calling a "taster" with the idea that it might entice you to buy the course. I promised myself that this time I would not let any stage upset me, that I would stay open minded and not worry about my results. I allowed myself to have fun, and up until the very last step, it was fun. It started with "doodling" flower shapes with your non-dominant hand on papers that had been gessoed. I used some pages out of an old book and some blank receipts. I've never liked sketching exercises having you use your non-dominant hand but Laly demonstrated the difference in look when compared to ones made with your dominant hand. Not going for realistic here, not looking at reference photos, and using water soluble pencil and charcoal pencil that would be activated with gel medium to smudge and seal them. This was much more fun than I anticipated and the activation was magic!


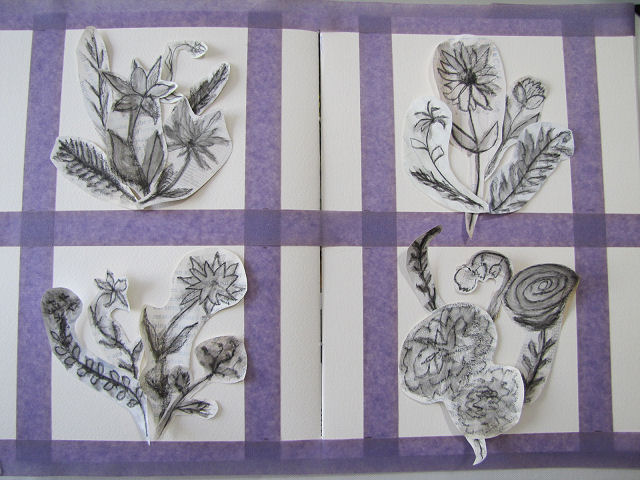
Next step was to cut or tear out the individual flowers and pick favorites to gather into 4 groups of posies which you could then audition on whatever you were using for a substrate. Rather than cut 4 pieces of 5 x 5 watercolor paper as I did for the last class I took from Laly, I decided to work in the big art journal sketchbook, taping off 5 x 5 inch areas to work in. Later you will see my arrangements changed a bit when gluing them down and I wish I'd checked this photo at that point.


Now to add some color to the bouquets with pieces torn from magazines. You can see I have a bit of a pink hangover yet from the color challenge with Laly. Can I help it if the first things I ran into as I sorted through the bin of papers were the pink leftovers from that challenge? I wanted to use the big rose but at this point didn't know which group to add it to.


Finally, we get to do some collaging, the thing I want to get better at. I heeded Laly when she said this was just to add a little something to the page and some texture, so I didn't go hog wild covering every inch. Besides, I had that feeling that little of this would show in the end. I just repurposed some of the scraps torn off the doodle flowers.


Laly always adds paint to soften and blend this stage of the collage. I just can't get the hang of this even after watching her do it several times. Again, I told myself not to worry because I was pretty sure this layer would be covered up. (I was right.) Still, good practice. And if you look closely, I used a neutral color of paint all around the edges like a frame which did still show in the end (although I wished I'd used the other color I was considering which was more like the dark yellowish papers).


Time to make the final arrangements of the bouquets and adhere them with gel medium. I could feel myself tensing up as I'm not comfortable with my arrangements not going down exactly as I've carefully put them together but I had to shake that off and be happy with the outcome. After all, this is supposed to be play, not some masterpiece. And this arrives me at the awkward teenage stage, the place where you look at what you've done and either think it is a hot mess (not what I was thinking) or you know it needs more but may not be sure what (exactly what I was thinking). Laly gave instructions of what to be looking for to change and improve, contrasts in value and shape to add, even permission to paint out what we didn't like, add in more collage elements, pencil in stems and leaves we might have collaged over. I started with those small strips of pink to balance out the strong pink collage elements. A good start and followed Laly's suggestion of adding some straight elements to contrast all the curves of the flowers.


At this point, I knew I had to walk away from it for a bit. Had a lot of racing to watch over the weekend anyway. When I looked at it again on Monday I thought, not so bad after all. And I'd had some time to think about what I might do to improve it. Most of my flowers were pretty smudgy grey and Laly says she almost always adds some white or black as a final touch, so I whitened up some of the darker flowers with white gesso (the white gel pen and the white Maribu art crayon were too translucent). Then I wanted to "pink up" some of the other blooms and add green too which I did with my Inktense pencils, so inspired was I with what happened with the water soluble pencil. Really rewarding seeing the dull color come to life when a wet brush is added. Finally I used a black micron pen to clean up some of the smudged or covered up with paint outlines of the flowers and leaves, penciled in one small bud on a stem, inked the words "bloom, blossom, flourish and grow" on the pink horizontal strips and spattered a little green ink over each. I'm really quite pleased with the outcome. Click on the photo for a bigger view of details - I've left that photo larger than usual.

My worktable looks a lot like it does after a quilting project is complete, only it's scraps of paper, glues and paint that needs picking up and putting away. Several people taking the class commented that now they know the value of saving every scrap of paper while I was thinking this is just like quilting where I can't throw out a single scrap of fabric. There are leftover doodle flowers too, two that I really like but are too big for the 5 x 5 format, some that could go into another arrangement, a couple I really should just toss, and Laly mentioned that the too large ones could just go on larger paper while the other leftovers could make yet another smaller piece or on the front of a card. I think my too big ones may go on another page of this sketchbook with background collage that is not hidden from view and the others into a posie that could go on a small book cover. We shall see. For now, I should move on to the baby quilt.

Tuesday, April 16, 2024

Resolved

Awkward Teenage Stage from February

Down to the last lingering project on my worktable, and irritated with myself that I'd not been able to move past being stuck, I spent some time over the weekend resolving the resolution word journal page. Goodness, high time to get on with it this many months past the beginning of the year. Above you see where I left it, still in an "awkward teenage" stage: ok but lacking. Addition of a few tan strips to balance the brown of the clock along with some hand written text helped but not enough.

Less awkward resolved version

Here it is after a breakthrough moment as I shuffled through my bin of collage materials and stumbled upon some possible solutions to get past the awkward stage. Still a little disjointed (I still struggle with covering up things I've strategically placed and softening edges for a less regimented look). But looking more complete.

Testing stamp & paint on Kraft Tex and gluing translucent bag images

One thing I didn't want to lose was the way the blue and yellow watercolor paint from the first layer gave this a bright positive feel. So I tended to paint around what was still showing through as I tried to blend or hide problem areas with periwinkle Fresco Finish paint. Not much improvement. There was a particularly troublesome area at the center top where the security envelop papers did not meet and I'd left some white showing at the end of one. The paint just sat there looking like it didn't belong. Finding a piece of fabric I'd stamped with a sun-like design I'd carved gave me my aha moment of what I could add to cover that area while adding more yellow to the spread. Then there was the translucent bag I'd saved that had swirls and stars on it. Would the translucent parts of cutouts actually disappear when gel medium held them in place? A test piece said yes!

Once I stamped that sun in the upper middle, I could see the solution to how to treat the narrow border around the outside of the spread. There were a few places where it had a bit of paint over it, and I wanted it to be clean white, so was considering painting over the outside with white paint. But now I could see that using the same yellow paint as the stamped image gave me the extra brightness I desired and cohesion too. The stamped image needed definition to show up on the security envelop paper so I outlined each part with blue micron pen.

Those stars and swirls really were the final touch that brought it all together. Added a few more encouraging words and am calling it good. Just in time to embark on another free collaging workshop with Laly Mille!

Wednesday, April 10, 2024

Tidying up and Some Organizing

Taxes are done but I do need to gather up my copies and documents into a manila envelop for filing away, and tossing what doesn't need to be kept. There's always shredding to do as well - old bills and things no longer needing to be kept from the oldest tax file as I add the most recent one to the file box. But that can be done in bits and pieces. I got distracted when on the computer and decided it was high time to do some organizing of my photos, moving some into files and deleting others. These are the sorts of things I put off but irritate me whenever I access my two main photo files - one where I download pics off my camera or the internet and one where I temporarily put photos I've readied to upload to the blog before moving them into more permanent files. Both become a cluttered mess if I don't keep up with deleting and moving to appropriate files. Think of it the same as the piles of clutter on my worktable. However, one type of filing I do seem to keep up with is the organization of what I print out in the course of making books. I have two books made with those disks that allow you to add and remove pages, one for the monthly bookbinding instructions and one for the challenges and extra info like how to make bookcloth. Besides printing off directions and what the sample book looks like, I also like to print out any books others in the group have made with ideas I think I'd like to incorporate should I make the book again. There in the picture above is the latest challenge instructions and inspirational books duly put away.

This left me with a couple of quick finishes I've been putting off but will help with clearing off work spaces. In the course of going through the fabric stack that came off the floor when I had the rug cleaned, I ran across a few of these hot glue medallions I made back in 2019. Really liked the idea, wasn't sure how to use them. But the one I'd painted with the muted violet paint said, "How would I look on the cover of that "First Journal Challenge" book? I'd always thought it needed something, so auditioned the medallions, letting each sit for at least a day's worth of considering before settling on the violet one which picked up the same undertones as in the wrinkles across the paper. Wasn't sure about how to attach it (was NOT going to fiddle with my hot glue gun) and defaulted to PVA glue. If it doesn't hold up, I can always try something else.

And then there was the closure on the 2nd Celtic Weave Journal. I'd run the choices past members of the Handmade Book Club and of those who responded, all went for the wide flat elastic over the narrow green one. I was leaning that way too and felt it would attach well without leaving any lumps. First off was determining how far to cut the slits from the top and side. And of course, I cut the slits in the flap instead of the cover - I've been making all sorts of small mistakes like that lately. Fortunately, the unevenness of the handmade paper camouflaged the cuts which were on the inside anyway. Then I inserted the ends of the elastic (see arrows), securing them with Fabri-Tac.

Now I could cut pieces of double sided Scor-Tape to length to attach the flaps to make packets. Here the protective paper is ready to be peeled off.

And here is the flap folded over, adhered top and bottom to make the flap.

This is essentially the same type of closure as on my commercially made book I'm currently using for quotations. I like that the elastic does not go totally around the book.

And the elastic really does match the color of the leaves embedded in the paper. I may have made the elastic a bit snug, but I do know how elastic tends to give over time, and this is a book I think I will be adding to over many years.

I did spend some time yesterday on the resolution word art journal spread, trying to do some blending with paint and adding a few more strips of paper here and there. I'd like to get it finished up because I am taking another one of Laly Mille's free five day classes starting next week, more practice in collaging, and instead of using 4 individual small pieces of watercolor paper as she suggests, I think I will just work in this large art journal. It's a good deadline for something I think I have dawdled over too long. I definitely got stuck in that "awkward teenage stage" and can tell I am still struggling with not wanting to cover things up once on the page. But I think I had a bit of a breakthrough yesterday and am eager to proceed with my most recent thoughts. Will share when finished!

Wednesday, April 03, 2024

Bonnet & Sock

Did you all have a lovely Easter weekend? I sure hope so. We had beautiful warm weather that enticed me out for longer than usual walks and gave me an opportunity to try out, not exactly an Easter Bonnet, but a new hat for hiking. I don't usually buy hats without trying them on first, but this one looked good in the catalogue and is made from a UV protective fabric rather than straw like my other hats. Really wanted something for between stocking hats/ear warmers and straw hats. Not keen on the straight-on view but it probably looks fine to anyone else and the wide brim give good protection.
 

And for Sunday brunch, I'd succumbed to these luscious looking walnut caramel cinnamon rolls from my grocery store's bakery. They were just as good as they looked.
 
Taxes are getting there, wrapping up the Federal ones that I do with TurboTax software. They made a lot of changes in how it looks moving from screen to screen and a specific change in one part where I have to manually add information on my many investment transactions, the main reason I use tax software. These are the redemptions that provide what I live on each month, otherwise I probably wouldn't have to file at all. Anyway, I ended up on the website to discover others were questioning how to enter info as we've always entered it and that they'd been unable to file because of this obvious bug. The complaints ran through February but the issue had since apparently been fixed. Once I learned where to enter my info, I had no problems getting through to the end, which left me thinking, sometimes procrastination actually pays off! Now on to the state taxes which are simple enough not to need software help.
 

And yes, I was still procrastinating through the week, to the point I picked up the sock knitting again. I was farther along when I last put it down than I remembered so it wasn't long until I was binding off and hoping that I didn't do that too soon, that both socks were the same length. So much dawdling, so many frustrating moments, so many mistakes had left me with very mixed feelings about these socks. I do like them, generally speaking, just not how I had to make them.
 

The directions did say the starting tail thread at the toe might need to be pulled up to close holes. And yes, I have a hole to fix in the toe.
 

But there are also holes in the heel-turn to fix (down by my thumb and to the left of my finger where the stitches make a right angle turn). I don't think I ever "got" exactly what was going on there with the stitch used to increase and decrease to make the turn.
 

However, I do like the 2 x 2 ribbing, and they sure are warm and comfy. I want to make the knee high version because I think with that ribbing they would stay up well. I even stopped by one of the yarn shops in the area to see what was available in sock yarn, commiserating with the owner over my struggles, only to have her say, "And you're going to make another pair with this pattern?" Well, yes and no. I've already perused other patterns with different ways to start at the toe and turn the heel (yes, when I should have been working on taxes!), and will substitute a different method when the time comes.

Tuesday, March 26, 2024

Racing, Skating and Taxes

As the weekend neared, I was surprised to find that two of the three motorcycle roadracing series that I follow had rounds scheduled AND that World Figure Skating Championships would also be broadcast. Hours of racing to watch, hours of figure skating to watch, over 3 days. So much for making progress on the Rails quilt! It also dawned on me that the deadline for submitting tax returns is quickly approaching and I'd not done a thing except load the tax software that I use. Believe it or not, I did get a little work done on the taxes while listening to pre and post race commentary, but really need to focus on it this week. Oh, and it's the end of the month and there are a few bills to pay and budgeting figures to work out, so I don't think much studio time will get squeezed in. However, I did run across this new Zentangle that I really wanted to add to my "Just Add Red" sketchbook and decided I may as well spend a little time with it this afternoon. Sometimes you have to take a moment to treat yourself. I intend to add one or two more lines of what they have named "Puppy Hugs" intertwining behind this one before doing the shading. This tangle looks good at several stages so the behind ones will probably be partials of the main one. Instead of the Micron pens I usually use, I've chosen these Uniball Air pens because the red one works so well in this sketchbook.

What, if anything, has been keeping you away from your studio?

Tuesday, March 19, 2024

Starting on Rails

It's been a really long time since I bought quilting fabric, even longer since I bought any specifically for a project. But here I am, looking for inspiration for a quilt to go to my goddaughter's latest baby, and I find it in two places: An AQS pattern called Rainbow Rails and a new line of Moda fabric with Noah's Ark theme at my local quilt shop. You can spot the two designs I picked from the line peeking out from under the pinks I mentioned a month ago that had me all in a tizzy and confused. But living with them out like that for so long has helped me calm down and see what is going to work. The more muted pinks go better with the raindrops fabric on the left, the blue fabric in the middle has animals and will be the backing. I ended up getting 3 yds each of the new fabric, unsure of which would be backing and which background, and got it washed and ironed, along with the batiks in the last post, over the weekend. Straining my brain to remember how I set my newer washing machine, digging out the Synthropal, reminding myself how to use Retayne on the batiks. It really has been a long time.

EQ layout print out, Original AQS pattern directions, Graph paper cutting guide

So Saturday was National Quilting Day - did you remember? Did you devote any time to quilting? - and getting started on this quilt was how I planned to spend it, but the fabric prep took up so much time I didn't even get any cutting done as I'd hoped. But because I needed to make changes to the Rainbow Rails pattern to turn it from a big quilt to a smaller one, I was on my own in terms of cutting dimensions and number of pieces and blocks. Another thing I haven't done in ages is use my EQ software to help size things and decide on a layout. But I soon got the hang of it and printed out two versions along with its estimates of fabric requirements. In the end, I decided on a reduced size block of 12 inches set 3 x 4. The raindrops fabric that will be background/sashing/borders is directional so I opted to get out graph paper to determine how best to cut the longest strips since some will run parallel to the selvage while others will run selvage to selvage. It just felt like it would be working in the dark if I didn't do this and now I can confidently start cutting. Not sure if I'll mix in another color other than pink like I did in the mock-up but do like how that looks.

Wednesday, March 13, 2024

Getting There

Tiny needles, thin thread, slow progress . . . this second sock is taking forever even though I am now past the heel turn and into a steady knit two purl two ribbing. I pick it up in the evenings when watching certain tv shows that don't require my eyes to be locked onto the screen but many evenings I find I'm too tired to move from the couch to the big leather chair with the good lighting to work on it. Ah well, eventually . . .  In the meantime, I keep running across sock knitters who talk of blocking their socks when done. Somehow I don't feel the need but there must be a reason. So with nothing better to do, I started searching for sock blockers that would accommodate knee highs since I plan my next pair to be a pair of those. Such a wide range of blockers are available but all short with one exception. These birch blockers with free customization were a bit pricey but since they come from Ukraine, I decided to splurge. My name and logo are burned into the birch, and the length of the foot can be adjusted for many sizes. I am pleased!

I'm about ready to dive into the baby quilt. My ironing board is functional as an ironing board again and half of the work table cleared of bookmaking projects etc. so I can get that new fabric washed and ironed and start cutting. While I'm at it, I'm planning on washing the last fabric splurge I made back before I started having physical issues keeping me from sewing - they were one more thing I'd left on the floor and never got around to tending to. One is a batik with mariner compasses on it that I thought I could pair with one of the specialty fat quarters - why I didn't want to put either away. Maybe I'll finally get them together. Three or four spotted batiks which I've always loved, reminding me of water and were on sale. A dark brown solid that I thought might bleach interestingly. A rusty orange batik that I thought could work into one of my nature-inspired art quilts. Time to get them washed and into the stash.

Speaking of art quilts, Ellen Anne Eddy recently described art in conjunction with her work with some students. Ellen was quite prominent in the quilting world when I landed in Wisconsin in the early 1990's and discovered what a hotbed of quilting the Midwest was. My late friend Judi somehow knew so many of these quilters who taught and hung out at quilt shows and Ellen was one she introduced me to as we queried her about dyeing fabric. I'm not a particular fan of her heavily thread painted nature pieces, but she knows her stuff and is a delightful person still. Here is what she said:

"I run into a lot of people who tell me they aren’t artists. Usually, that’s because they’re more verbal than visual. If you talk with them they can explain their images and the concepts in a way that brims with art.  Perhaps the problem is how do we define art?. If it has to be set in a mold, like figure drawing, or landscapes, that’s a pretty big limit on a much wider world. But if art is, vision out of chaos., order out of disaster, and the creation of beauty and sense in the retelling of ourselves., that may be where my definition hovers. Art is life. The way we live creates our own beauty, our own songs, soothes our worst fears, and helps us to see ourselves in a different mirror that focuses on our strengths and beauty, instead of our failures and misgivings. Art simply flows out of that. The things we produce our wonderful. But they are largely the byproduct of the process of restructuring who we are through our imagery. These kids already have it. I believe we all do, from birth."

You can see some of the kids' beginnings of their fabric art on Ellen's blog post here as well as read more about the project.